grout cleaning

Silver Travertine Floor Renovation Shenfield

Renovating a Silver Travertine Kitchen Floor in Shenfield Brentwood

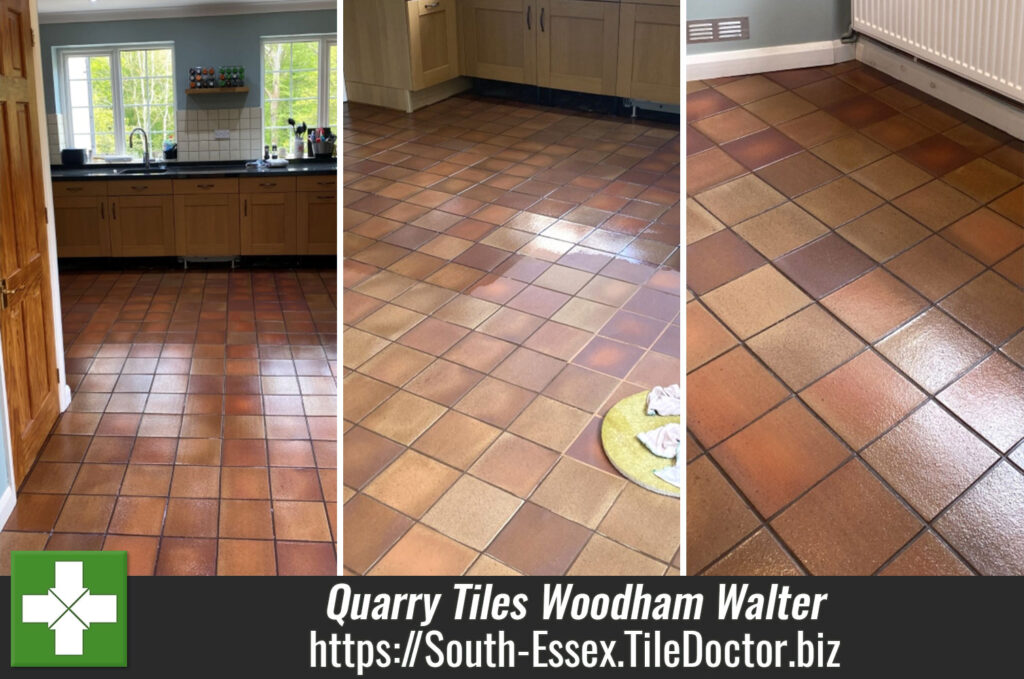
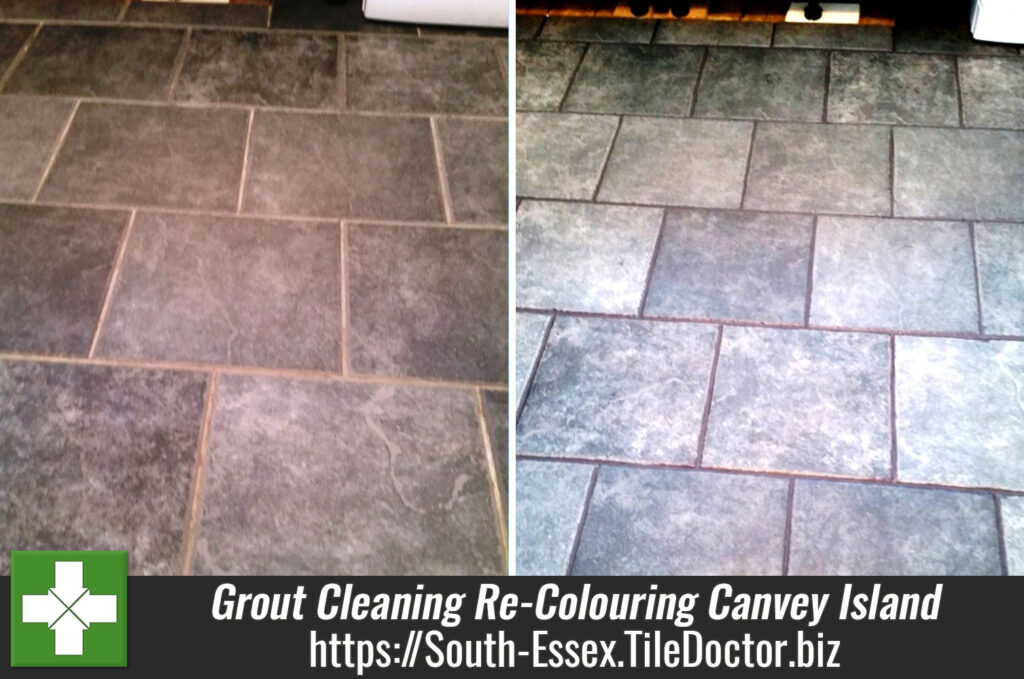
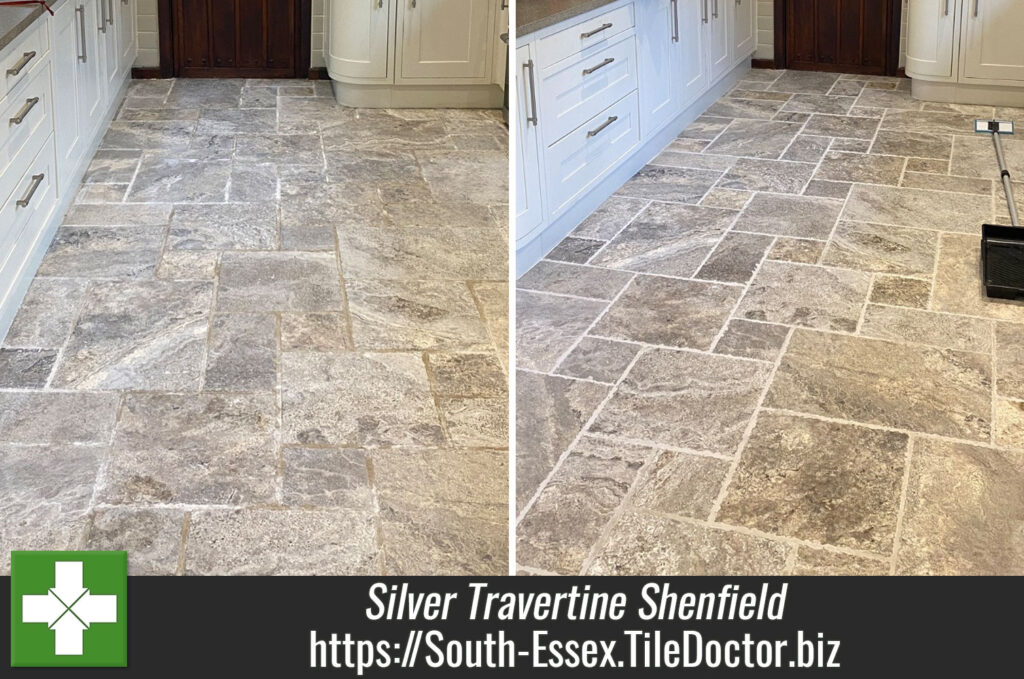
The tiles in the pictures below are Silver Travertine located in the Kitchen of a client in Shenfield which is an affluent suburb of Brentwood. Silver Travertine rich blend of Silver and Grey and displays lots of character when maintained. In this case the floor hadn’t been cleaned and sealed in some years and the previous sealer had now worn down leaving it vulnerable to ingrained dirt and resulting in a dull appearance.

Unhappy with how the floor now looked I was asked to quote for renovating it. The owner was struggling to keep it clean and wanted it cleaning and re-sealing, additionally the grout was stained in places and needed attention.

Silver Travertine Floor Before Cleaning Shenfield Silver Travertine Floor Before Cleaning Shenfield

I called in to survey the floor and was able to see for myself the problems they were facing. I worked out a plan for renovating the stone and grout and discussed what sort of finish they wanted for the floor which would affect the choice of sealer.

The renovation plan led to the creation of a quote which was accepted and a date scheduled for the work to start.

Cleaning a Silver Travertine Tiled Kitchen Floor

On arrival I applied a 1:3 dilution of Tile Doctor Pro-Clean which was left to dwell for thirty minutes so it could soak into the pores and break down the dirt, grease, and any remaining sealer. The floor was then scrubbed with a rotary buffing machine fitted with a coarse 400-grit burnishing pad to get the stone clean and free of sealer.

The grout was then hand scrubbed to get it clean as possible; the pads do clean the grout but can struggle to reach into the recesses of the grout line, so I always find following up by hand gets the best result. The slurry was then vacuumed off the floor using a wet vacuum and then rinsed with water and vacuumed again.

Next step was to apply the next burnishing pad in the series which is a medium 800-grit. This is the first step in the polishing process which improves the appearance of the Travertine and adds a pleasing shine to the tile. The pad is run over each tile several times using only water to help lubricate. Once done the floor is rinsed and extracted with the wet vacuum as before. This polishing process was then repeated using a fine 1500-grit.

After another rinse and extraction to the floor was left to dry off overnight with a turbo dryer left in place for several hours to speed things up.

Sealing a Silver Travertine Tiled Kitchen Floor

Returning the next day, I completed the polishing of the Travertine using a very fine 3000-grit burnishing pad which is run over the floor dry using a little water sprayed onto each tile as you progress. This left the Travertine with a lovely subtle shine; it also leaves the floor dry and ready for sealing.

To get the best from Silver Travertine we had chosen to seal the floor using Tile Doctor Colour Grow which is an impregnating sealer that contains a colour enhancing formula. Two coats were applied leaving around thirty minutes drying time between each coat. Tile Doctor Colour Grow is an impregnating sealer that enhances and improves the colour and texture of natural travertine whilst providing durable protection.

Silver Travertine Floor After Grout Cleaning Shenfield

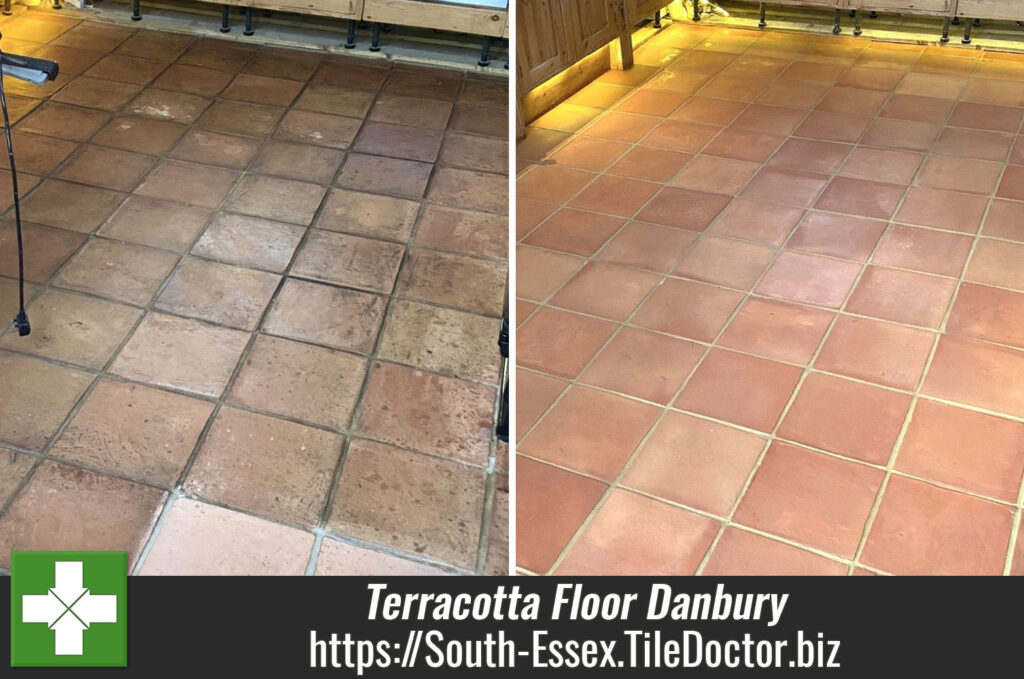
My client was very happy with the improvement in the appearance of the floor, and I think you will agree the Travertine and Grout looks so much cleaner and inviting.

Silver Travertine Floor After Renovation Shenfield

Before leaving I took time to discuss aftercare and recommended the client to use Tile Doctor Stone Soap as a maintenance cleaner.


Professional Restoration of a Silver Travertine Tiled Kitchen in Essex

Renovating a Silver Travertine Kitchen Floor in Shenfield Brentwood Read More »

Travertine Kitchen Floor Renovation Chelmsford Essex

Travertine Tiled Kitchen Floor Renovated in Chelmsford

Earlier this year I paid a visit to a client in Chelmsford who had a large that needed attention. The floor had been installed twelve years ago when a extension was added to the rear of the house.

Travertine Kitchen Floor Before Cleaning Chelmsford

Discussing the floor on the phone my client had said that the floor always seemed dirty and was proving hard to keep clean. This to me is a sign that the protective sealer that keeps dirt on the surface of the tile had failed. It is important to maintain the sealer on a stone floor as without it the dirt becomes ingrained in the pores of the tile where it is difficult to shift. With stone floors like Travertine, I always recommend our annual maintenance program to ensure the floor keeps looking its best.

I paid a visit to the property to survey the large floor and came up with a renovation plan that would deep clean the floor, remove the ingrained dirt from the tile and grout and then re-seal. Keen to improve the appearance of the floor my quote was accepted, and a date set for the work to start.

Cleaning a Travertine Tiled Kitchen

To remove what was left of the original sealer and get the tiles clean I applied a strong dilution of Tile Doctor Remove and Go and left it to soak in for ten minutes. Then the floor was scrubbed using a rotary buffer machine fitted with a Black pad running at a slow 150 rpm. The black pad was then changed to a poly brush which would be better at cleaning into the recesses of the grout lines. The floor was then rinsed with water and the soiling extracted with a wet vacuum.

Travertine Kitchen Floor During Cleaning Chelmsford

Once clean I was able to inspect the floor and spot clean any stubborn areas. With the cleaning finished the floor was given a final rinse and then dried as much as possible with the wet vacuum. The floor was then left to dry off overnight.

Sealing a Travertine Tiled Kitchen

I returned the next day and checked the floor was dry using a damp meter. I always like to do this as applying sealer to a damp floor can result in a patchy result. The moisture readings were fine, so I went ahead and sealed the floor with two coats of Tile Doctor Colour Grow sealer.

This is a colour enhancing impregnator that works by soaking into the pores of the stone, improving colour and preventing dirt from residing there. Tile Doctor Colour Grow is ideal for characterful tiles like travertine as it helps bring out the brown shades in the stone. It certainly did the trick on this floor and helped bring out its character.

Travertine Kitchen Floor After Cleaning Sealing Chelmsford Travertine Kitchen Floor After Cleaning Sealing Chelmsford

For aftercare cleaning I recommended Tile Doctor Neutral Tile Cleaner which is a gentle yet effective tile and grout cleaner that won’t impact the sealer. This is important as many of the tile cleaning products you find in supermarkets are simply too strong for use on a sealed floor and will quickly degrade the sealer.


Professional Cleaning of a Travertine Tiled Kitchen in Essex

Travertine Tiled Kitchen Floor Renovated in Chelmsford Read More »

Quarry Tiled Kitchen Floor Renovation Woodham Walter

Quarry Tiled Kitchen Floor Deep Cleaned and Satin Sealed in Woodham Walter

The photos are of a large Quarry tiled Kitchen floor at a property in Woodham Walter which is a small village between Danbury and Maldon. The floor had been installed 20 years ago by the current owners and although in reasonable condition they felt it was time to have them renovated as the tiles had lost their sheen and now looked flat and unattractive.

Quarry Tiled Kitchen Floor Before Cleaning Woodham Walter Maldon

I went over to survey the floor and quote for deep cleaning and then re-sealing. The photographs don’t really show it, but it was clear to me that the sealer had worn off and it was the sealer that had brought the depth and colour to the quarry tiles.

We discussed the process which would take two days and decided on a sealer that would best match their expectations. They were happy with my quote and the work was booked in.

Cleaning a Quarry Tiled Kitchen Floor

On arrival I set about prepping the floor for cleaning which for this floor primarily meant removing the kick boards from underneath the kitchen units.

Working in sections I set about cleaning the quarry tiles using Tile Doctor Remove and Go. This as the name of the product suggests is a coatings remover that cleans the floor and removes any sealer left on the tiles. Although it had been some time since it was last sealed its important that all the previous sealer is removed before applying a new sealer. This ensures you don’t end up with different levels of sealer and some areas appearing darker than others.

The Remove and Go was left to soak in for ten minutes before being worked in with a rotary buffing machine fitted with a black scrubbing pad. The grout was also scrubbed into the grout lines by hand using more solution and a stiff brush. This action lifts the dirt out of the floor and turns the cleaning solution and old sealer into a slurry, this is then rinsed off with water and extracted with a wet vacuum.

Next, I treated the tiles to an acid rinse using a 1:5 dilution of Tile Doctor Grout Clean-up. This further cleans the tiles and will neutralise the pH level of the floor following the use of Tile Doctor Remove and Go earlier which is a strong alkaline. The acidic nature of the product microscopically etches the tiles to ensure a stronger bond with the sealer.

The Grout Clean-up was brushed into the floor and then rinsed off with more water before being extracted with the wet vacuum. After another rinse with water the wet vacuum was then utilised to get the floor as dry as possible before leaving it to dry off fully overnight.

Sealing a Quarry Tiled Kitchen and Dining Room

The next day the moisture level of the Quarry tiles was checked using a damp meter to ensure the floor was dry enough for sealing. This is always worth doing as applying sealer to a damp floor can result in a patch appearance.

Quarry Tiled Kitchen Floor During Sealing Woodham Walter Maldon

The moisture readings were fine and so work started on sealing the tiles using Tile Doctor Seal & Go which works really well on Quarry tiles and results in a warm satin sheen finish. This product is also water based so you don’t get that solvent smell being given off as it dries.

Quarry Tiled Kitchen Floor After Cleaning Sealing Woodham Walter Maldon

Sealers work by keeping the dirt on the surface of the tile where it can be easily cleaned away and on the subject of aftercare cleaning I recommended the use of Tile Doctor Neutral Tile Cleaner. It’s important to use a neutral tile cleaner on sealed floors like this as stronger bleach-based products will wear the sealer off prematurely.

Professional Restoration of a Quarry Tiled Kitchen and Dining Room in Essex

Quarry Tiled Kitchen Floor Deep Cleaned and Satin Sealed in Woodham Walter Read More »

Terracotta Tiled Kitchen Floor Renovation Danbury Chelmsford

Filthy Terracotta Tiled Kitchen Floor Renovated in Danbury

The Terracotta tiles in the kitchen of this property in Danbury near Chelmsford were installed by the owners only five years prior. At the time they didn’t like the light colour of the terracotta, so they were sealed with a black pigment added to the sealer in an attempt to darken the floor. Five years later and the sealer had clearly failed, and the tiles and grout were now seriously filthy and impossible to clean.

I wanted to be certain I could remove the dirt and old sealer so whilst at the property surveying the floor I did a cleaning test with Tile Doctor Remove and Go scrubbed into a couple of tiles by hand. The product worked really well and easily cleaned the tiles and grout with excellent results (see picture).

Terracotta Tiled Kitchen Floor Before Cleaning Danbury Chelmsford

The difference was quite striking and equally impressive so after I worked out a quote, they were more than happy to get me booked in to complete the floor.

Deep Cleaning a Terracotta Tiled Kitchen Floor

I returned on the agreed date and immediately set about applying the same process to get the Terracotta tile and grout clean. I used a strong dilution of Tile Doctor Remove and Go working it into the tiles using a black scrubbing pad fitted to a rotary machine which also cleaned the grout lines.

The Terracotta was rinsed, and the soiling extracted with a wet vacuum. Once done the tiles and grout were inspected and any stubborn areas re-treated using the same process until I was satisfied the Terracotta, and grout was as clean as possible.

The underfloor heating was switched on and used to dry the floor overnight so it would be dry and ready for sealing the next day. This was a helpful addition and avoided the need for me to get the fan dryers out overnight.

Sealing a Terracotta Tiled Kitchen

Terracotta is made from clay and as a result is a very porous material, because of this it took eight coats sealer before it was fully sealed. I applied Tile Doctor Colour Grow sealer for this, it contains a colour enhancing formula which really brought out the orange and red colours in the tile.

This sealer is an impregnator that works by soaking into the tile, occupying the pores and ensuring dirt remains on the surface where it is easily cleaned away. It will provide long term protection moving forward and it improves the appearance of the floor without the tiles becoming too shiny.

Terracotta Tiled Kitchen Floor After Cleaning Sealing Danbury Chelmsford

I think you will agree from the photographs that the floor was completely transformed, and I’m pleased to say the owner was really happy and shocked to see it so different from before.

For aftercare cleaning I recommended Tile Doctor Neutral Tile Cleaner, this is a pH neutral product which will ensure the newly applied sealer retains its integrity. Many household cleaning products are simply too strong and will strip away the sealer with use.


Professional Restoration of a Terracotta Tiled Kitchen in South Essex

Filthy Terracotta Tiled Kitchen Floor Renovated in Danbury Read More »

Limestone Kitchen Floor Renovation South Ockendon

Dirty Limestone Kitchen Floor Cleaned, Polished and Sealed in South Ockendon

Pictures below of another Limestone floor that I recently renovated, this time in the open plan kitchen and dining area of a home in South Ockendon. Originally installed over ten years ago it had never been sealed and over time dirt had worked its way into the stone leaving it looking dull and flat.

Limestone Kitchen Floor Before Cleaning South Ockendon

Stone floors need to be sealed if you want them to look their best, sealing ensures the dirt remains on the surface where it can be easily cleaned away. Sealers can also enhance the appearance of the stone and improve colour; the only downside is they do wear off with use but a good sealer can last three years or more if maintained correctly.

I went over to the property to survey and measure the floor to be able to give them an accurate quote for deep cleaning, polishing and then sealing the stone. I could see it would be a straight-forward job with little complications so I worked out a quote based around two days work and products needed to bring the Limestone back to life.

Cleaning and Polishing a Limestone Tiled Floor

The cleaning process was a repeat of a similar job I recently completed in Leigh-on-Sea and involved cleaning out all the dirt trapped in the pores of the stone by working in a 1:4 dilution of Pro-Clean using a coarse 200-grit pad. These coarse pads are fitted to a buffing machine and run over each tile several times to open up the pores of the stone allowing the dirt to be flushed out, they also remove minor scratches, sealers, and ingrained dirt.

Limestone Kitchen Floor During Cleaning South Ockendon

The floor was then rinsed and soiling extracted with a wet vacuum before applying the next coarse pad which was a 400-grit. This process was then repeated with a medium 800-grit and fine 1500-grit pad which close the pores and refine the appearance of the Limestone.

Next step was to scrub the grout lines using more Tile Doctor Pro-Clean. I find this is best done by hand as the pads struggle to reach into the recesses of the grout line. Once done the floor was rinsed and extracted several times to neutralise the floor and remove any trace of product.

The floor was then left to dry off and I returned a few days later to give the floor plenty of time to dry.

Sealing Limestone Floor Tiles

On my return I started with the application of an extra fine 3000-grit burning pad, this is applied dry to the floor using only a little water sprayed onto the tile a process we call a Spray Burnish. It leaves the floor nice and dry and is the last step in the polishing process leaving the stone with a nice subtle sheen.

As mentioned earlier sealers protect the floor and some will improve colour and for Limestone, I find Tile Doctor Colour Grow works well. The product contains a colour enhancing formula that really brings out the best in Limestone. Its also an impregnator which works by occupying the pores in the stone thus preventing dirt from becoming ingrained there. Only two coats of Colour Grow were needed to fully seal the stone.

Limestone Kitchen Floor After Cleaning Polishing South Ockendon

The Limestone floor responded well to the process transforming the space from dull and un-inspiring to one that was very appealing and inviting. The stone and grout looked so much lighter and cleaner with a subtle polish that made the owners very happy.

For the aftercare cleaning of a polished stone floor like this we recommend using Tile Doctor Stone Soap. It’s a gentle yet effective cleaner that helps maintain the patina and won’t damage the sealer ensuring it lasts a long time.


Professional Limestone Floor Cleaning and Polishing in Essex

Dirty Limestone Kitchen Floor Cleaned, Polished and Sealed in South Ockendon Read More »

Limestone Hallway Floor After Renovation Leigh-on-Sea

Renovating a 12-Year Old Limestone Hallway Floor in Leigh-on-Sea

The Limestone floor in the picture below was actually installed by the homeowner in the hallway of their property in Leigh-on-Sea twelve years ago. They had managed to do a good job maintaining it however overtime dirt had accumulated in the pores of the stone and they realised it was time to have it professionally cleaned.

Limestone Hallway Floor Before Cleaning Leigh-on-Sea

I visited the property to survey the floor and provided them with a quote to deep clean the Limestone tile and grout, hone the stone to bring up the polish and then seal to protect it going forward. Happy with the quote we set a date for my return.

Cleaning and Polishing a Limestone Tiled Floor

On arrival the first task was to clean out all the dirt trapped in the pores of the stone. To do this I ran a coarse 200-grit pad over the floor assisted with a dilution of Tile Doctor Pro-Clean. The coarse pads are fitted to a buffing machine and run over each tile several times to remove minor scratches, sealers, and ingrained dirt.

The floor was then rinsed and soiling extracted with a wet vacuum before applying the next coarse pad which was a 400-grit. This process was then repeated with a medium 800-grit and fine 1500-grit pad which are the first stages in bringing up the polish on the Limestone.

Next step was to scrub the grout lines using more Tile Doctor Pro-Clean. I find this is best done by hand as the pads struggle to reach into the recesses of the grout line. Once done the floor was rinsed and extracted several times to neutralise the floor and remove any trace of product.

The floor was then left to dry off overnight.

Sealing a Polished Limestone Tiled Floor

The next day I gave the tiles a spray burnish using an extra fine 3000-grit burning pad, this is applied dry to the floor using only a little water sprayed onto the tile. It leaves the floor nice and dry and is the last step in the polishing process.

To get the best out of the colour in the Limestone I recommended sealing it with Tile Doctor Colour Grow, which as its name implies contains a colour enhancing formula. Its also an impregnator which works by occupying the pores in the stone thus preventing dirt from becoming ingrained there. Two coats were applied and this ensures dirt remains on the surface where it can be easily removed with regular cleaning.

Limestone Hallway Floor After Cleaning Sealing Leigh-on-Sea

Once done the Limestone tile and grout looked so much lighter and cleaner making the owners very happy. For the aftercare cleaning of a polished stone floor like this we recommend using Tile Doctor Stone Soap. It’s a gentle yet effective cleaner that helps maintain the patina and won’t damage the sealer ensuring it lasts a long time.


Professional Limestone Floor Polishing in Essex

Renovating a 12-Year Old Limestone Hallway Floor in Leigh-on-Sea Read More »

Travertine Kitchen Floor Renovation Gidea Park Romford

Dirty Travertine Kitchen Floor Tiles Renovated in Gidea Park Romford

These photographs are of a Travertine kitchen floor at a property in Gidea Park near Romford. The floor was approximately 20m2 and had been laid 20 years ago. Although it had been sealed the client had been cleaning the floor with the wrong products and that had stripped the sealer off the floor. As a result, dirt had become ingrained into the pores of the stone making it look very dirty.

Travertine Kitchen Floor Before Cleaning Gidea Park Romford Travertine Kitchen Floor Before Cleaning Gidea Park Romford

My client was so unhappy with its appearance they were seriously considering taking the Travertine tiles up and replacing it with something more manageable, as they could never get it to look clean. You can imagine their relief after I visited and advised them that the floor could indeed be recovered.

After surveying the stone floor, I worked out a plan for its renovation and provided them with a quote which they were happy to go ahead with.

Cleaning a Travertine Tiled Kitchen

I started the cleaning with the grout lines which had darkened with accumulated dirt. To do this I applied a 4:1 dilution of Tile Doctor Pro-Clean along the grout lines and left it to soak in for ten minutes. The grout lines where then scrubbed by hand until their original colour returned. Although harder work, I find this method works better than using pads with a machine as the pads can struggle to reach into the recesses of the grout lines.

To get the ingrained dirt out of the stone and restore the beautiful appearance of the Travertine I used a set of Tile Doctor Burnishing pads. These are applied with a rotary buffing machine starting with the coarse 400-grit pad and worked into the stone with more Tile Doctor Pro-Clean.

Travertine Kitchen Floor During Cleaning Gidea Park Romford

After rinsing and extracting I then moved onto the 800 and 1500-grit pads, using only water this time for lubrication and rinsing and extracting after each pad. The last 3000-grit pad was applied with a little water sprayed onto the tiles to bring up a polish on the stone.

Sealing a Travertine Tiled Kitchen Floor

The floor was left to dry overnight, and I returned the next day to seal it using two coats of Tile Doctor Ultra-Seal sealer to give it a nice sheen. This will give the floor hardwearing protection by ensuring dirt remains on the surface where it is much easier to remove with regular cleaning.

Travertine Kitchen Floor After Renovation Gidea Park Romford Travertine Kitchen Floor After Renovation Gidea Park Romford

My client was very happy with her new floor and relieved that the new sealer would make it much easier to keep clean going forward. She also left a 5-star review and commented:

“GOOD JOB….PLEASED”

On the topic of cleaning, I recommended Tile Doctor Neutral Tile Cleaner which is a pH neutral cleaner. It will not strip the sealer like the previous products she had been using and should ensure the floor is kept in this condition for many years to come. Obviously, we are on hand in the future if she has any further problems.


Source: Travertine Kitchen Tile Cleaning and Renovation Service in Gidea Park South Essex

Dirty Travertine Kitchen Floor Tiles Renovated in Gidea Park Romford Read More »

Grout Cleaning Re-Colouring Canvey Island

Grout Cleaning And Re-Colouring A Ceramic Tiled Floor In Canvey Island

Here’s a quick grout cleaning and re-colouring job I completed in the town of Canvey Island, Essex. Canvey Island lies on the south east coast, and lies just above sea level which in my job is always worth noting as the area can be prone to flooding. This wasn’t the problem here though, simply put, my client was unhappy with the colour of their grout, and wanted it re-coloured to a darker shade to match the grey Ceramic floor tiles.

Cleaning the grout before re-colouring is essential because, as many readers are probably well aware, grouts are porous and therefore can very easily absorb dirt and grease. Most often this will result in grout discolouration if not dealt with promptly.

Ceramic tiles before cleaning and colouring in canvey island

Cleaning and Re-Colouring the grout lines of a Ceramic tiled floor

So, as mentioned above the first step in the re-colouring process involved cleaning the grout lines. For this Tile Doctor has a special Pre-Treat Cleaner which is sprayed on and scrubbed into the grout to both remove any existing dirt and also to prepare the grout joints for a superior bond with the Grout Colourant. Once complete the grout lines looked clean and refreshed.

To clean the ceramic I diluted one part Tile Doctor Pro-Clean to three parts water, and used it to wash down the Ceramic tiles, leaving a consistent level of cleanliness across the entire floor. I then rinsed the floor with water which was then extracted using a wet vacuum and waited for 3 hours for the floor to dry.

Once dry, I began the process of applying the Charcoal Grey (as chosen by the client) Grout Colourant to the grout lines. As well as changing the colour the colourant also forms a barrier over the grout sealing it in and protecting it from future staining for years to come.

Then, once dry, the floor was given another quick clean using a light spray of water and a white buffing pad, resulting in an aesthetically pleasing sheen finish. My client was very happy with the outcome and now has the floor they wanted.

Ceramic tiles after cleaning and colouring in canvey island


Cleaning and Re-Colouring grout lines with grout colourant in Essex

Grout Cleaning And Re-Colouring A Ceramic Tiled Floor In Canvey Island Read More »

Scroll to Top