kitchen

Basalt Tiled Kitchen Floor Cleaning Polishing Sealing Chelmsford

Basalt Tiled Kitchen and Bathroom Floor Renovated in Chelmsford

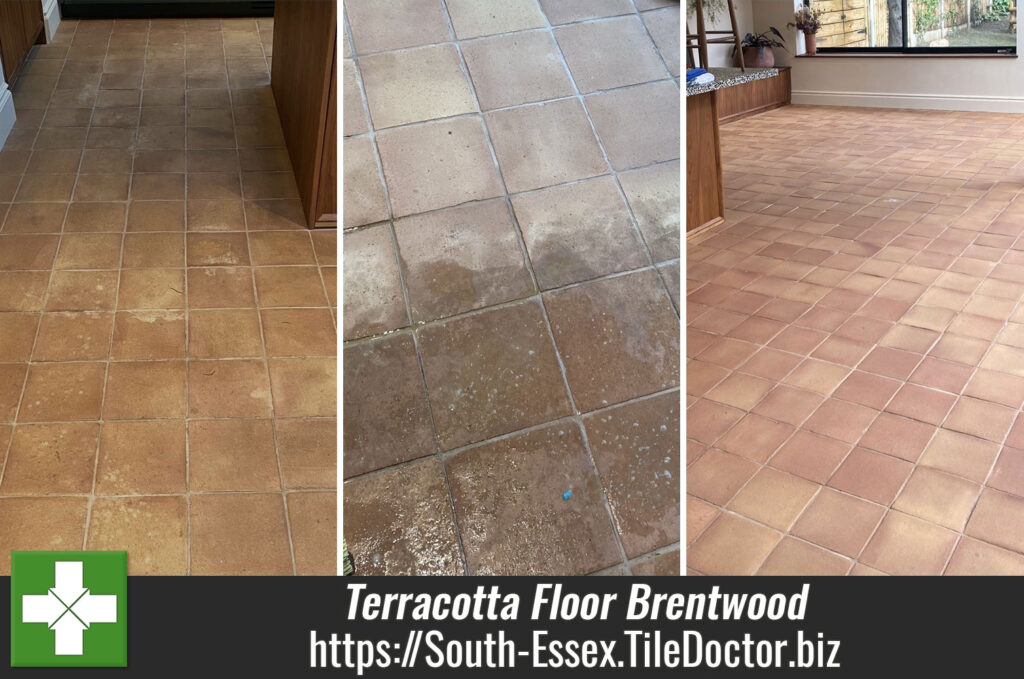
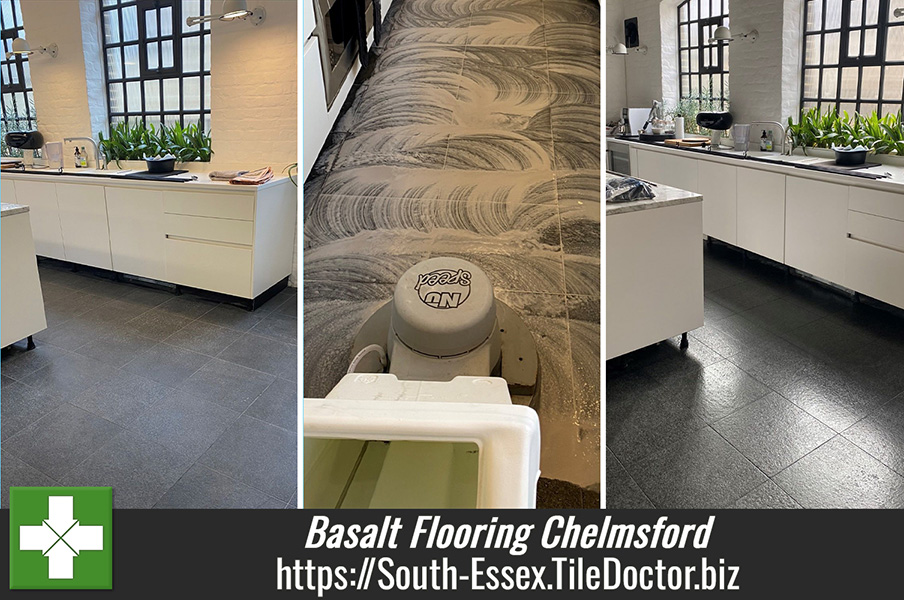
I thought I would share the following case study which involved the renovation of Black Basalt tiles in the kitchen and bathroom on a property in Chelmsford Essex. The owner had the tiles installed ten years ago and since that time they had lost their appeal and now looked dull and flat.

Basalt Tiled Bathroom Floor Before Cleaning Chelmsford Basalt Kitchen Floor Before Cleaning Chelmsford

Unhappy with the way they looked he decided to call me in to see what could be done to revitalise the tiles improve their appearance.

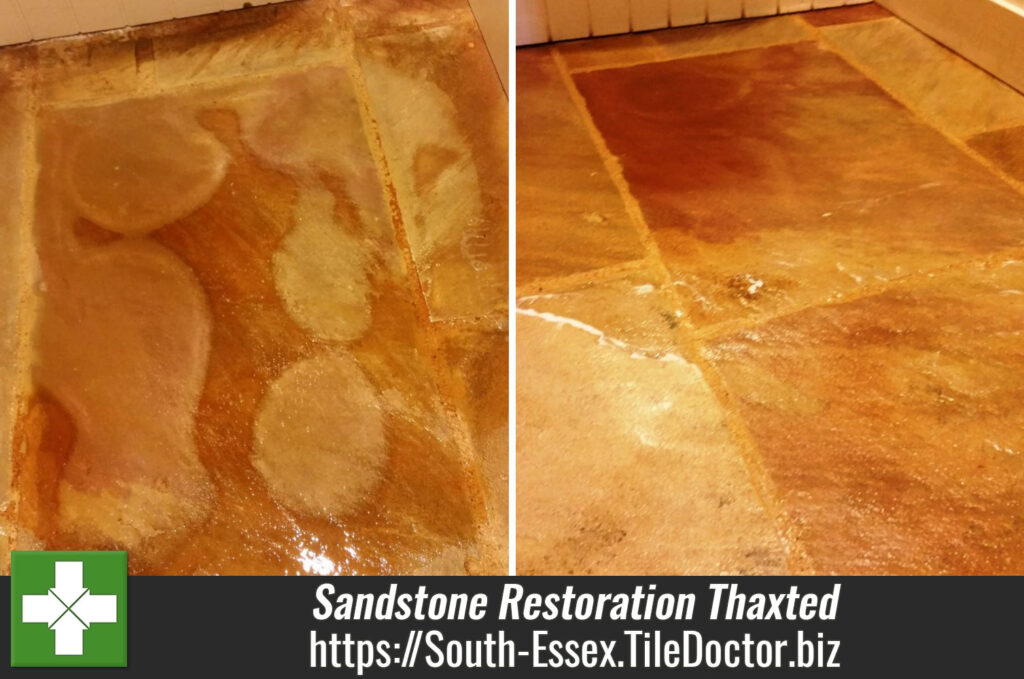
I called in on the property when I was next in the area to do some measurements and run some tests to work out the best way of proceeding. Basalt isn’t a very popular tile which is surprising as it’s a very hard stone and has a lot in common with Granite. Nevertheless, I was confident that by treating it in the same way as a hard stone I would be able to get the best out of the tiles and restore it to its original condition.

I worked out a renovation process and submitted a quote for the work which was accepted.

Cleaning a Basalt Tiled Kitchen and Bathroom Floor

I returned on the agreed date and set about cleaning the floor using Tile Doctor Remove and Go worked in with a 400 and then 800-grit burnishing pad fitted to a rotary buffer running at a slow 150 RPM.

Tile Doctor Remove and Go is a cleaner and seal remover, I had worked out that the previous sealer had worn off on most of the floor, so it now needed to be completely stripped off and replaced. The 400-grit burnishing pads are great for cleaning hard stone, the coarse pad got right into the basalt tiles lifting the dirt and what remained of the old sealer to the surface where it was rinsed off with water and extracted with a wet vacuum. The 800-grit burnishing pad is a polishing pad and adds a slight sheen to the surface.

Basalt Kitchen Floor During Cleaning Chelmsford

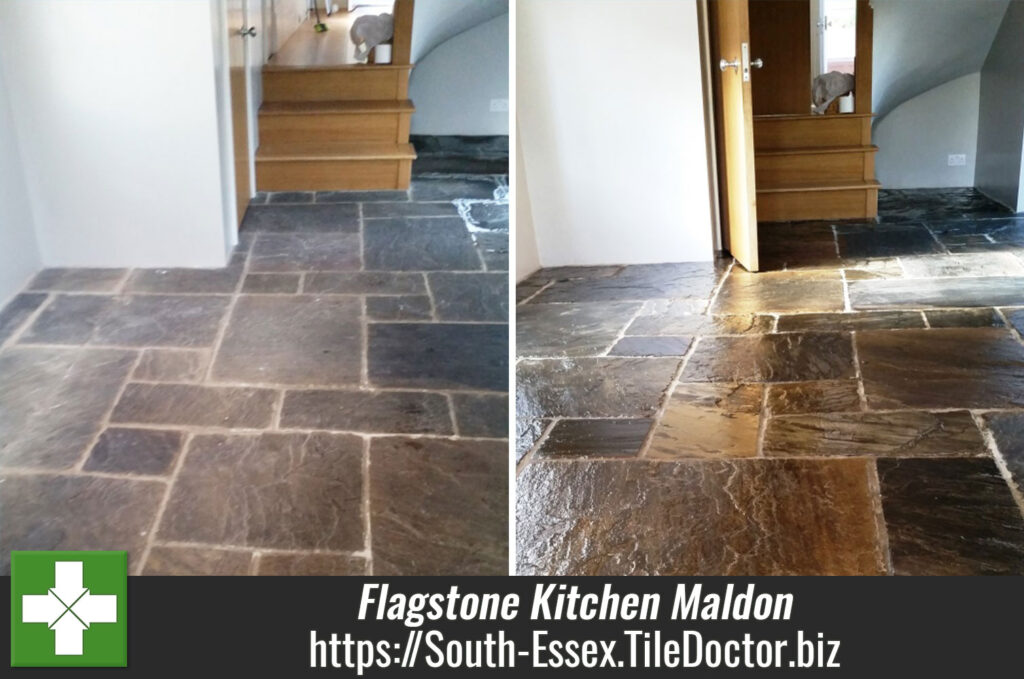
Next the tile and grout were treated using a weak dilution of Tile Doctor Grout Clean Up, paying extra attention to the cleaning of the grout lines in the process. This is an acidic cleaner which also neutralises the floor following the use of Remove and Go which is alkaline.

After another rinse with water and extraction with the wet vacuum I left a blower in place to dry the floor for a couple of hours and asked the owner to put the under-floor heating on overnight to full.

Sealing a Basalt Tiled Kitchen and Bathroom Floor

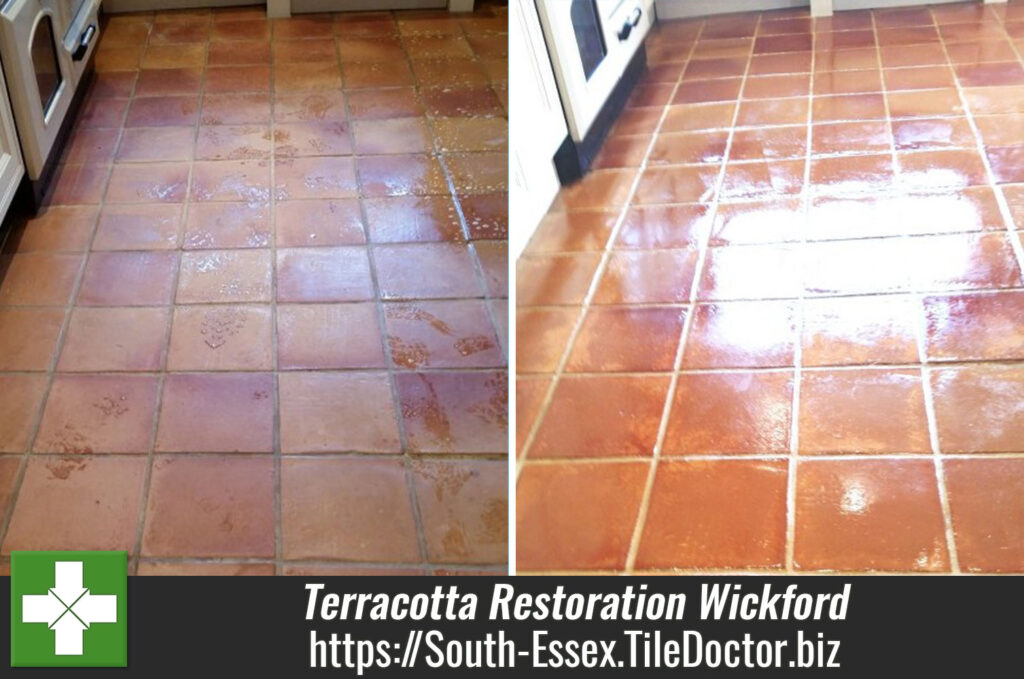
The floor had dried by the next day, and I was able to start applying the first of what would be two coats of Tile Doctor Xtra Seal to give the basalt its correct look. X-Tra seal is a modern oil-based sealer that is rated for wet areas and puts colour and structure back into the stone.

Basalt Kitchen Floor After Cleaning Chelmsford Basalt Kitchen Floor After Cleaning Chelmsford

Having two separate areas to seal worked to my advantage as I was able to start sealing the bathroom floor whilst the first coat to the kitchen floor was drying.

Once complete both Basalt floors looked great and my client was very happy with the difference we had managed to achieve. Additionally, the new sealer will ensure dirt remains on the surface of the stone making it easier to clean going forward.

Basalt Tiled Bathroom Floor After Cleaning Chelmsford

On the subject of cleaning, I recommended the use of a PH neutral floor cleaner such as Tile Doctor Stone Soap going forward. This product won’t impact the sealer and contains a patina enhancer which will help the stone keep its polished appearance.


Professional Restoration of a Basalt Tiled Kitchen and Bathroom Floor South Essex

Basalt Tiled Kitchen and Bathroom Floor Renovated in Chelmsford Read More »

Terracotta Floor Renovation Brentwood

Sticky Linseed Oil Removed from a Terracotta Kitchen Floor in Brentwood

This is a Terracotta tiled floor at a property in Brentwood that had been recently installed. Unfortunately, the tilers decided to seal the terracotta with a linseed-based sealer that hadn’t gone off and was still tacky to the touch causing it to trap dirt. I suspect they simply put too much down; however, I was surprised they used linseed as this is a very old-fashioned method of sealing terracotta when modern sealers offer far better performance.

Terracotta Floor Before Cleaning Brentwood

The solution I offered was to strip the linseed off the floor, give the tiles a good clean and then re-seal with a modern based sealer designed for the job. Happy with my quote and relieved the problem could be resolved, we agreed a date to complete the work.

Cleaning a Terracotta Tiled Kitchen

To strip off the Linseed Oil I applied a strong dilution of Tile Doctor Remove and Go which is a powerful alkaline coatings remover. It was left to work breaking down the linseed for about ten minutes and then scrubbed in using a rotary machine fitted with a black 17″ pad. The soiling was then rinsed away with water extracted using a wet vacuum. This process had to be repeated several times before the floor was clear and I used several pads in the process.

The grout was then hand scrubbed using Tile Doctor Pro-Clean, these were small terracotta tiles so there was a lot of grouting to cover. Afterwards the soiling was rinsed off and extracted as before using the wet vacuum.

The last step in the cleaning process was to give the floor an acid rinse using a dilution of Tile Doctor Grout Clean-Up. It was scrubbed in with a deck brush to remove excess grout smears and neutralise the pH level of the floor following the use of alkaline cleaners. Once done it was rinsed away and extracted as before.

Terracotta Floor During Cleaning Brentwood

Sealing a Terracotta Tiled Kitchen

I left the floor to dry out for a couple of days, before returning to apply a new sealer which for this floor we had chosen Tile Doctor Colour Grow. This is an impregnating sealer that soaks into the pores of the tile preventing dirt from becoming lodged there and thereby protecting it from within. Colour Grow as its name suggests includes a colour enhancing formula that improves the lovely orange/red colours so ideal for Terracotta.

Made from clay, Terracotta is a porous material and so does need quite a few coats before its fully sealed. For this floor I needed to apply give coats of Colour Grow, allowing for each coat to dry before applying the next. This is a low sheen sealer which will give the floor a much more hardwearing surface and it really brought out the natural colours in the Terracotta.

Terracotta Floor After Renovation Brentwood

My client was very happy with the difference and left the following 5-star review.

“Matthew was a pleasure to work with and did a fantastic job on a tricky terracotta renovation.”

For aftercare I recommended the use of Tile Doctor Neutral Tile Cleaner, which is a pH neutral tile cleaner, it’s a gentle yet effective product that won’t impact the sealer.

Terracotta Floor After Renovation Brentwood


Professional Restoration of a Terracotta Tiled Kitchen Floor in Essex

Sticky Linseed Oil Removed from a Terracotta Kitchen Floor in Brentwood Read More »

Sandstone Restoration Thaxted

Restoring Poorly Maintained Sandstone Tiles in Thaxted

Sandstone is a particularly popular choice for kitchen and hallway floors amongst home owners in the UK. It not only possesses beautiful natural shades and features, but it is also typically hard wearing, making it an ideal stone for tiled flooring in high traffic areas of a house and can often be found laid as large riven flagstones in pubs and other commercial premises.

Naturally, just like any other type of tiled floor, Sandstone needs to be maintained using appropriate products and methods. A lack of adequate surface sealer in particular leaves Sandstone susceptible to ingrained dirt, and can leave distinct, unsightly patches such as those in the photograph below.

Sandstone Floor Before Cleaning in Thaxted

In this instance, I visited a client in the old Essex town of Thaxted, who believed that her four square meter Sandstone tiled floor might be suffering from damp issues after lifting up the mats covering the area.

However, when I arrived at the property and ran damp tests, I found the issue to be superficial. The Sandstone floor however did require attention in the form of a deep clean and a fresh seal to tackle the white patches and prevent further discolouration.

Cleaning a Sandstone tiled floor

To begin the cleaning process I spread Tile Doctor Remove & Go evenly across the floor. It was left to dwell for approximately 15 minutes, during which time it worked to break down the old sealer remaining on the tiles. I then agitated the area twice over with both a black scrubbing pad fitted to a rotation machine lift away any dirt.

The resultant slurry was removed using a wet vacuum and the floor was then rinsed with water and then mixed a strong solution of one part Tile Doctor Pro Clean to three parts water which was used to give the floor a final clean and scrub the grout clean before using the wet vacuum again and giving the floor a final rinse with water.

Sealing a Sandstone tiled floor

After completing the cleaning process I left the floor to dry over the weekend. Upon my return to the house I proceeded to seal the tiles with three coats of Tile Doctor Colour Grow which is an impregnating sealer that soaks into the pores of the stone and provide durable surface protection going forward. Colour Grow is also specially designed to let the floor breathe and enhance the natural colours in the stone and, in this case, really helped to intensify the natural sand-coloured shades in the tiles.

Sandstone Floor After Cleaning in Thaxted

The difference made to these Sandstone tiles was really noticeable, with the white patches completely removed and the surface more generally back to looking like new, needless to say, my client was very happy with the results.


Patchy Sandstone Tiles Cleaned and Maintained in Essex

Restoring Poorly Maintained Sandstone Tiles in Thaxted Read More »

Terracotta Restoration Wickford

Terracotta Tiled Kitchen Floor Refreshed in Wickford

Sealers really do bring out the best in Terracotta tiles, however the catch is they will wear off over time and if you want to maintain that appearance you have to work out a regular maintenance plan. If you don’t maintain the sealer you will find that the sealer near the most heavily used areas such as doors etc. will wear away first and once that happens dirt will become ingrained in the tile and becomes difficult to clean resulting in a patchy appearance.

The remaining sealer on this Terracotta tiled kitchen floor at a house in the town of Wickford, Essex was no longer effective and had worn completely off in places. The solution was to strip off the old sealer, clean the Terracotta tile and gout and then re-seal with a fresh seal.

Terracotta Kitchen Floor During Cleaning Wickford

Stripping Sealers from Terracotta Tiles

I started by giving the floor a deep clean with Tile Doctor Pro Clean diluted 2 parts water to 1 part cleaner. This is quite a strong dilution designed to allow the removal of the sealer and was left to dwell on the floor for ten minutes before working it into the floor using a scrubbing machine fitted with a black pad. Surprisingly the sealer was proving difficult to shift in certain areas and I had to repeat the process a few times and made sure to give the grout a good scrubbing as well.

I managed to get rid of most of the sealer using this process and for the remaining stubborn areas I used a stronger product called Tile Doctor Remove and Go which is a very effective coatings remover that is safe to use on tiles. This did the trick and the floor was now free of sealers and the grout was looking much better too, the resultant slurry was removed using a wet vacuum and I then rinsed the floor several times with water before leaving it to dry for weekend.

Terracotta Kitchen Floor During Cleaning Wickford

Stripping Sealers from Terracotta Tiles

Tile Doctor Colour Grow which is an impregnating sealer that seeps into the pores of the tile to block them and prevent contaminates becoming ingrained in there and it also enhances the natural colours. Once this was dry I followed up with a number of coats of Tile Doctor Seal and Go which is topical sealer that will protect the surface and adds a nice sheen to the floor and is a popular choice for Terracotta and Quarry tiles.

Terracotta Kitchen Floor After Cleaning and Sealing Wickford

I’m not sure my photographs do this post any justice however hopefully you can see that floor was quite transformed, the grout is much cleaner and the colours in the Terracotta have really come to life.


Maintaining Terracotta Tiles in Essex

Terracotta Tiled Kitchen Floor Refreshed in Wickford Read More »

Flagstone Kitchen Maldon

Flagstone Tiled Kitchen Floor Cleaned and Sealed in Maldon

Here’s a job I completed not too long ago in the town of Maldon, which sits alongside the Blackwater estuary in South Essex. Although the Flagstone tiled floor in my client’s kitchen was – generally speaking – in good physical condition, the surface seal had worn down over time, leaving the tiles looking dull and lifeless.

Flagstone is quite a hard wearing stone that is commonly used for both internal and external surfaces, whether this is something as simple as a kitchen floor, or something more complex like a public monument. I was commissioned to restore the floor back to looking it best, by way of a thorough clean and a new seal.

Flagstone Floor Before Cleaning Maldon

Cleaning a Flagstone tiled floor

My go to cleaner for most kinds of natural stone tile is Tile Doctor Pro-Clean, a high alkaline product which contains both cleaning and stripping properties depending on the dilution ratio. In this case I wanted a strong solution so I could strip off any remaining sealer and so it was diluted one part Pro-Clean to three parts clean water. The solution was left to dwell for 10 minutes, allowing it to soak into the stone and get to work breaking down any remaining sealer.

I then attached a black scrubbing pad to my rotary machine, and used this to agitate the solution into the tiles. This helped to lift out any ingrained dirt and remove the stubborn marks blemishing the floor. Once the initial clean had been completed, I turned my attention to the grout between the tiles, using Pro-Clean in combination with a stiff grout brush to clean up the grout as much as possible. I cleaned the floor twice in total before rinsing the entire area with water and leaving the house for a few days, giving the surface time to dry.

Sealing a Flagstone tiled floor

Upon my return to the house, I ran some damp tests to double check that the floor had dried completely. This is important as any residual moisture can potentially damage the performance of the sealer. Once I was satisfied that the tiles were able to take the seal, I applied two coats of Tile Doctor Colour Grow sealant.

Flagstone Floor After Cleaning Maldon

Colour Grow is an impregnating sealer that seeps into the pores of the stone provides durable stain protection from within, along with a nice finish. It’s also specially designed to intensify the natural shades and colours in the stone, turning dull floors into characterful household features. Colour Grow is suitable for use most stone surfaces, including Flagstone, Limestone, Marble, Quarry, Sandstone and Slate.

My customer was very pleased with the result, with marked differences in condition and appearance achieved in the space of a few short days.

Flagstone Floor During Sealing Maldon


Tile cleaning and sealing for Flagstone tiled kitchen floor restoration in Maldon, South Essex

Flagstone Tiled Kitchen Floor Cleaned and Sealed in Maldon Read More »

Saltillo Terracotta Abridge Essex

Saltillo Terracotta Tiled Floor Cleaned and Sealed in Abridge

Pictures below of a job we did cleaning and re-sealing a 25m2 Saltillo Terracotta tiled floor installed in the kitchen of a house on a working farm outside Abridge, Essex. The owner had been applying coats of sealer for the last 10 years or so and over the course of time a bad build-up of layers of sealer had occurred causing and un-even and darkening effect on the tile (see picture below).

Saltillo Terracotta Floor Before

Cleaning Saltillo Terracotta Tile

Removing the old sealer to get back to the bare Terracotta surface was incredibly hard work, normally we can get most of the sealer off with a strong dilution of Tile Doctor Pro-Clean but in this case something a lot stronger was required so we applied Tile Doctor Remove and Go (which is a coatings remover designed for taking off sealers and other coatings from tile) mixed 50/50 with Nano Tech Ultra-clean which adds tiny abrasive particles to the mix. We applied the resulting solution and let it soak in for 30 minutes before tackling it with scrubbers and a steamer, gradually over the course of three days we managed to remove all of the sealer. We rinsed the Terracotta down with clean water to remove any trace of chemical and neutralise the floor before sealing and then left it to dry out.

Saltillo Terracotta Floor After Cleaning

Sealing Saltillo Terracotta Tile

We left the floor for 10 days to dry out and came back to seal it using two coats of Tile Doctor Colour Grow which is a colour enhancing sealer that protects the tile as well bringing out the natural colour in the tile.

Saltillo Terracotta Floor Part Sealed

I left the floor to cure overnight, and came back the next day to finish sealing with Tile Doctor Seal and Go, Seal and Go is a water based sealer so it doesn’t give off an odour when it’s drying and also offers durable stain protection together with a low sheen finish. In the end the floor actually took seven coats of Seal and Go before it was fully sealed, this naturally took a long time to apply as you have to wait for it to dry before applying the next coat. Needless to say this was a very long job but the difference was remarkable and the owner was very happy with the result.

Saltillo Terracotta Floor After Sealing


Difficult Saltillo Terracotta Floor Cleaned and Sealed in Essex

Saltillo Terracotta Tiled Floor Cleaned and Sealed in Abridge Read More »

Scroll to Top